
Create a static website with Github Pages and Hugo
Posted on April 24, 2022 • 6 minutes • 1234 words • Other languages: Français
During the last two years, I studied Networks and Telecommunications at the IUT of Châlons-en-Champagne. Among the skills I acquired, there are, of course, technical skills but also communication skills.
During my third year project, I was asked to replace the traditional paper project report by a static website, whose vocation was also to serve as a documentation of the project production.
In this case, to convey a message, it’s not the point to make an ultra well done website, with animations everywhere but very heavy. It is more effective to focus on sobriety and simplicity, so that the information is easy to find.
Moreover, when we write this information over a long period of time, and which is bound to evolve, it is unthinkable to start with classic code (HTML/CSS/JS), which would be too long to feed.
Static site generators
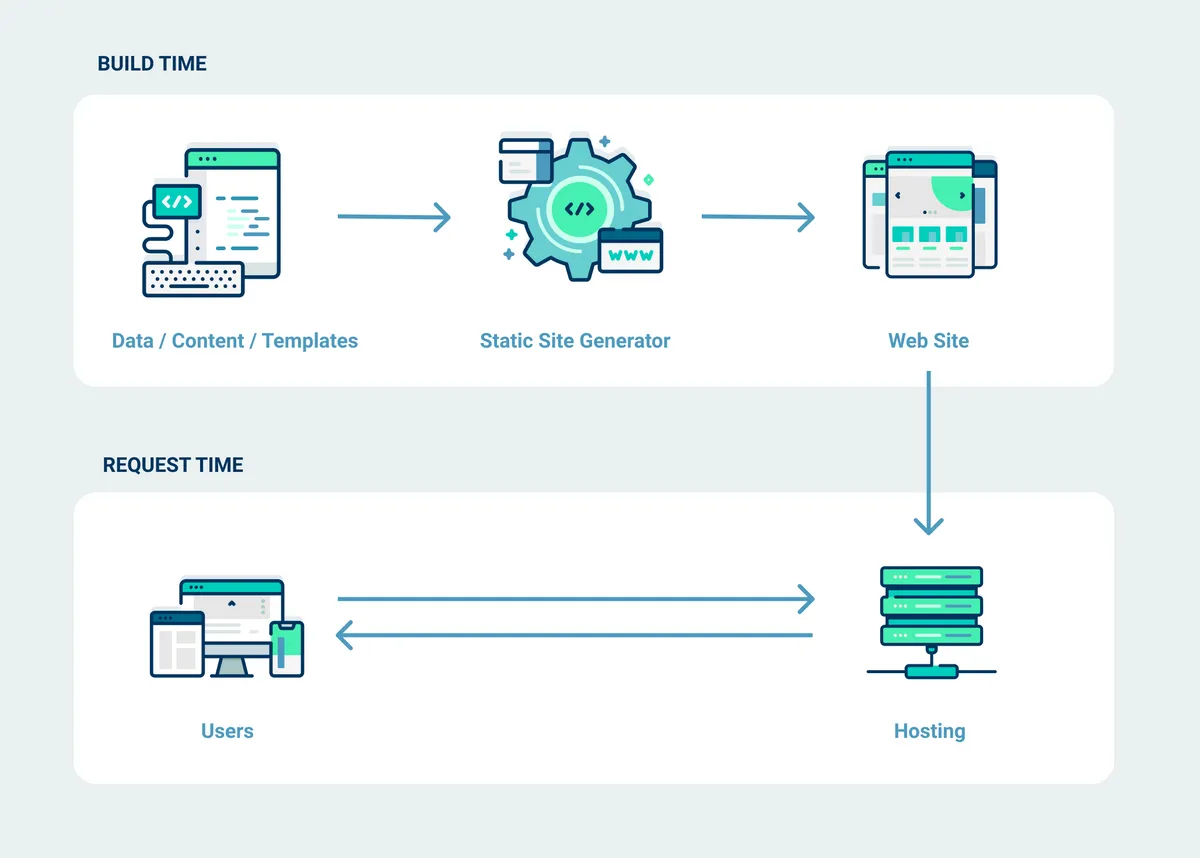
Static site generators are tools that allow you to create static web sites, i.e. without background communication with a server to provide data.
They are therefore simple web pages, whose content does not change in real time.
The advantage is that these tools use as a base files often in Markdown format (like the Github README).
This format allows a very simple formatting of text using symbols. For example # allows to create a level 1 title.
Then, the source code of the pages is generated automatically, without any human intervention. This makes it much easier to create content, without using traditional blogging platforms, which often include heavy modules for browsers. (Wordpress for example)
 Source : Netlify
The static sites generated are very fast, due to the fact that they are only stacks of HTML tags and CSS classes, without any other interaction.
The static site generator we will use here is Hugo .
Tutorial
Initialization of the site
First of all, we will create a new folder in which we will create our site.
mkdir static_personnal_site && cd static_personnal_site
In this folder, we will put the Hugo binary downloaded here: https://gohugo.io/getting-started/installing/
Then we will initialize the site with Hugo:
hugo new site
Here is the architecture created:
.
├── archetypes => contains the content templates
├── config.toml => contains the Hugo configurations
├── content => contains the contents
├── data => contains the data
├── layouts => contains the page templates
├── static => contains the static files (images, scripts)
└── themes => contains themes
Next, we will initialize the Git repo:
git init
Git here will be used to manage the different versions of the site. The GitHub platform will allow us to publish these different versions. We will not go into the details of these tools here.
Choice and installation of the theme
Then, we must choose a theme for the site.
The theme itself does not matter, it is to choose according to your tastes. What is important is to choose a theme that you can republish for your site. You have to pay attention to the license of the theme. Sometimes you have to buy it to be able to use it publicly.
Many themes are available here : https://themes.gohugo.io/
Once the theme is chosen, we will install it, to do this, we must copy the URL of the theme repo and then do the command :
git submodule add https://url_du_repo_du_theme.git themes/mytheme
Usually, the theme contains a sample site, which can be used as a base for your site. If this is the case, just copy the contents of the example folders into the site folder.
The most important thing in this case is to get the config.toml file from the theme, and put it in the root of the site. It contains information that is used by the different pages of the theme.
To check that everything is working well and that the site is “compiling”, you just have to do the command :
hugo server
From there, the site is accessible locally on port 1313. If everything works well, we can move on to the next step.
Continuous integration
In order to automatically compile the website when a file is modified, we will use Github Actions.
We will create a folder .github/workflows/ in the site folder, and put the hugo.yml file in it.
name: Hugo build

on:
  push:
    branches:
      - master # Set a branch to deploy
  pull_request:

jobs:
  deploy:
    runs-on: ubuntu-20.04
    steps:
      - uses: actions/checkout@v2
        with:
          submodules: true # Fetch Hugo themes (true OR recursive)
          fetch-depth: 0 # Fetch all history for .GitInfo and .Lastmod

      - name: Setup Hugo
        uses: peaceiris/actions-hugo@v2
        with:
          hugo-version: 'latest'
          # extended: true

      - name: Build
        run: hugo --minify

      - name: Deploy
        uses: peaceiris/actions-gh-pages@v3
        if: github.ref == 'refs/heads/master'
        with:
          github_token: ${{ secrets.TOKEN }}
          publish_dir: ./public
We will then create a Github repo, with a name of the form pseudo.github.io.
Then you have to go to your Github profile settings, “developer settings” tab, and generate a personal token (PAT) with access to repos.

Once this token is created, it must be added in the repo parameters, in a secret, whose name will be TOKEN.

Putting it online with Github Pages
From here, we’ll add this repo to the origin of the local repo.
git remote add origin https://github.com/user/user.github.io.git
Then we’ll upload the changes to Github:
git push -u origin master
From there, the site will be compiled automatically, but will not be available yet.
This automatism will create a gh-pages branch on Github, and copy the contents of the public folder. We will then have to tell Github that we have to publish the content of this branch.
To do so, we have to go in the repo settings, in the “pages” tab, and change this parameter:

From there, the site is available at the address https://user.github.io.
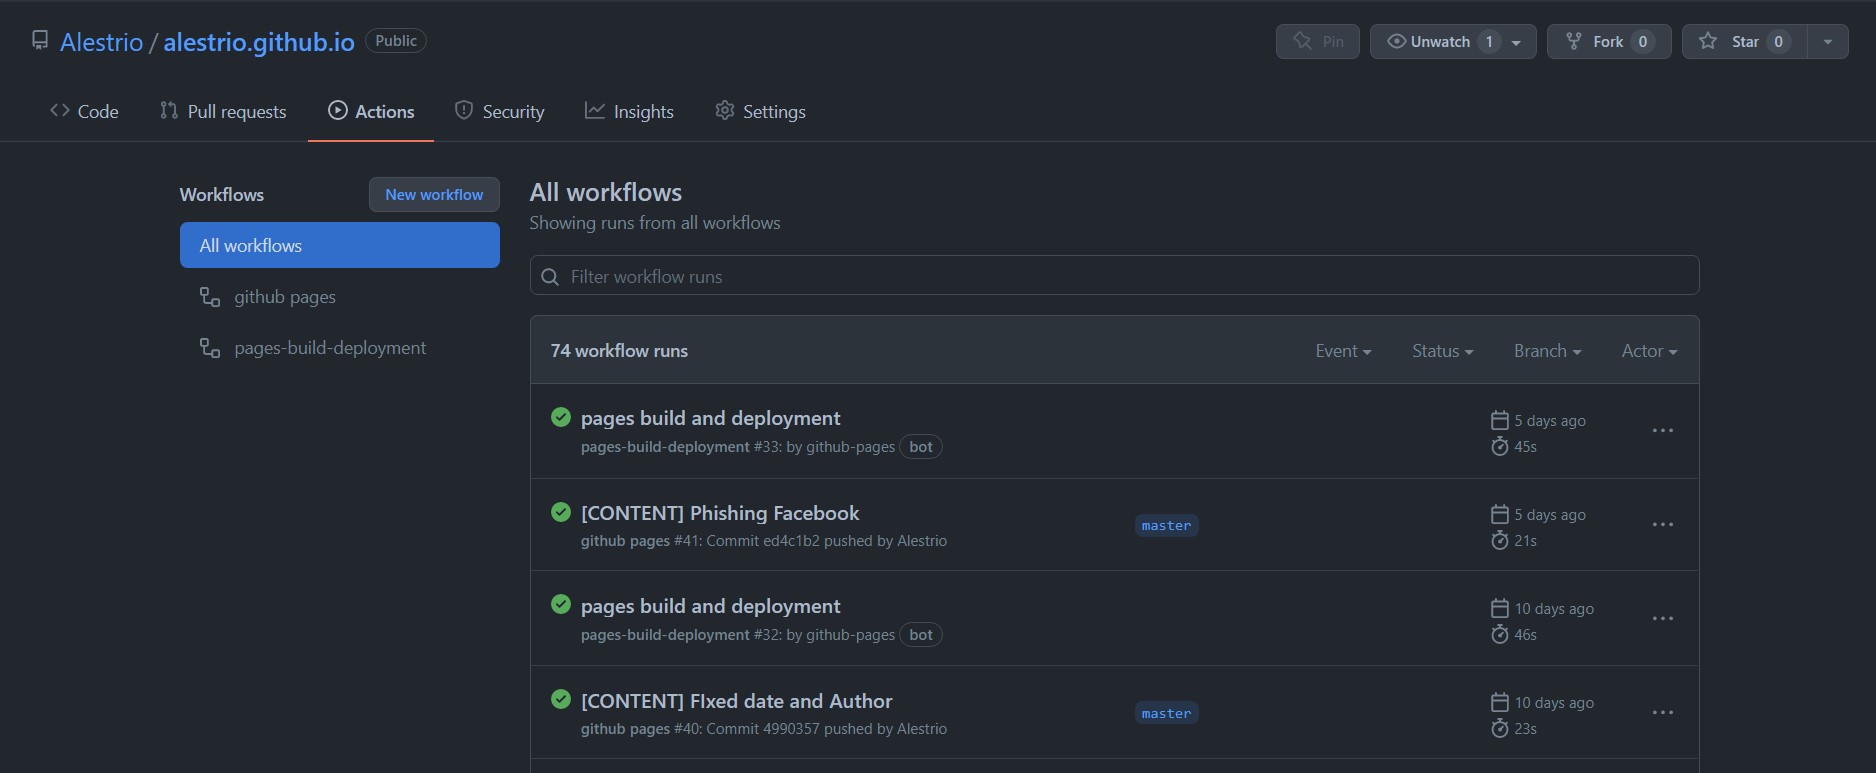
Deployment reports are available in the “actions” tab of the repo:
Bonus : Use your own domain
To use a custom domain, we will have to edit the DNS zone of the latter. In this DNS zone, we will create 4 fields A :
mydomain.com A 185.199.108.153
mydomain.com A 185.199.109.153
mydomain.com A 185.199.110.153
mydomain.com A 185.199.111.153
and 4 AAAA fields:
mydomain.fr AAAA 2606:50c0:8000::153
mydomain.fr AAAA 2606:50c0:8001::153
mondomaine.fr AAAA 2606:50c0:8002::153
mondomaine.fr AAAA 2606:50c0:8003::153

Once this is done, we will set the site to point to this domain. To do this, we need to go to the repo settings, in the “pages” tab, and change this setting:

Warning: the application of the DNS zone configuration can take up to 24 hours. So you may have to wait a little while to configure this parameter.
Publish content
To create an article or a page on your new site, it happens in the content folder. To create a new page, you just have to create a .md file in this folder.
At the very beginning of this file, you have to put a header of the form :
---
author: "Jean Bon"
title: "Title of the page"
date: 2022-04-23
tags: ["some", "words", "keys", "important"]
thumbnail: /images/one/miniature.format
---
Once this is done, you can write the content of the page.
To save the version of your site, just do :
git commit -m "New page"
… then send it to Github :
git push
Conclusion
You now know how to set up a static website with Hugo and Github Pages.
Note that with this method, it is impossible to dynamize the site with API data for example. This only allows to make very simple websites, but very fast to feed.